Before the Boat, the Space
The next big project — a new, more ambitious build — is in the works (details to follow). But first, we had to answer a big question: where do we do this?
We looked at options: residential-style courses (not long enough), the local maker space (not big enough), and hiring custom space (too far away). None of them quite met our requirements. One idea we kept coming back to was: can we use the garage? It’s a 20 m2 space, right on our doorstep.
This might sound like an obvious choice; however, a more accurate description of the space would be “big damp shed”. It has no power and is constructed from a mix of Yorkshire stone and concrete blocks with a flat cold roof.
In my day job, we talk about a minimum viable product as the simplest version of a product you can take to market. So I asked myself the question: what is the minimum set of changes needed to transform the space into a usable workshop?
We needed a space that is dry, well lit, has power available, and is clean. Inspired by stories collected by Ted Moores in his book Canoe Craft of people building boats in basements, dining rooms, and even a lounge, I came to the realisation that whilst this would not be the workshop of my dreams, but it would get the job done.
Moisture
The north-facing wall is often damp from the weather. A few years ago I added a stud wall backed by a membrane, which improved the situation, but the roof still let damp air from this space into the garage. To fix this I installed insulation between the rafters, stapled the leftover membrane on top, and boarded the whole lot using the cheapest option I could find — 3 mm plywood sheets. The finished surface is utilitarian, but the difference it has made is massive. Cold, moist air is now restricted to the roof space, and the air in the shop1 is drier.
Other things I did were install duct vents in the drier front wall to encourage passive ventilation, seal remaining gaps with expanding foam, and spot-coat with damp-proof paint. The walls aren’t fully finished but they’re good enough for now.
Power and Lighting
This was the biggest challenge — a power supply was a must for lighting and tools. However, running a mains connection wasn’t an option due to cost and complexity. Chatting about this in the pub one evening, a friend, John, told me about lithium-iron-phosphate batteries that you can now buy as a complete “power station” — a battery plus AC inverter that can be charged from the mains and then easily carried to the workshop. Could this be a simple and relatively “cheap” solution (compared to installing mains power) that would transform the space?
There are lots of products out there and this blog is not about product reviews; I chose an EcoFlow Delta 2, which is a 1 kWh battery with AC and 12 V outputs. The YouTube channel “Oh Joe!” does a great UK-based review of the unit. Highlights from his video include using the EcoFlow to power a MIG welder and a table saw, as well as being interrupted by the delivery of a sail boat!
Hand-in-hand with the power requirement was the need for lighting, and I looked for a lighting solution that would work with whichever power station option I chose.
Inspired by this Instructable, I ran two warm white 12 V LED strips — each one six metres long, with a total power draw of 30 watts. This meant I could use the EcoFlow’s DC5521 12 V output ports, which is more efficient than using the AC. The light strips give a really nice light and cover the entire area without too much shadowing.
The combination of light and power is an absolute game-changer. As well as the lights I’ve already used the power station to run a 240 V circular saw for ripping boards and a plunge router, both without problems. This setup won’t power a full industrial shop but for my purposes it does the job. I’m currently charging the battery once a week — it provides enough power for two full workshop days.
Clean & Tidy
The next project is going to involve sanding and epoxy. One of the things I was aware of from repainting Curlew was how hard it was to keep the space clean and dust-free, which is really important when gluing and painting. To help with this we painted the floor with a concrete sealant. This has massively reduced concrete dust when sweeping and made the space easier to clean after woodworking.
The second thing I did was to build a workshop air filter based on the amazing research done by the 3D Handyman on extending the Corsi-Rosenthal box design in a shop setting. Powered using an industrial fan we’ve now got the ability to filter the air in the shop. I’m planning a more detailed write-up of the filter — a lot of the examples were US blogs and videos and I had to invest a bit of time putting together a solution using parts available in the UK.
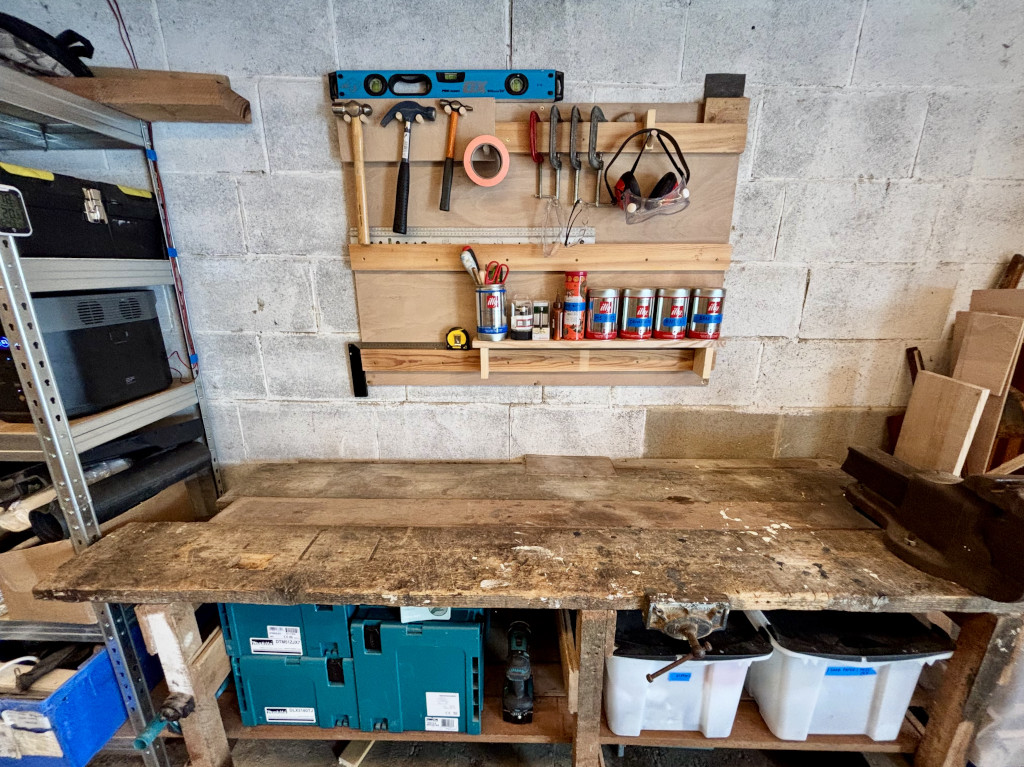
With the dust problem reduced it was time to clear the workbench. To help with this — and for fun — I built a French-cleat style tool board using scrap wood. This keeps frequently used tools off the bench and within easy reach, and is extensible by adding more cleat-backed holders in the future.
Summer Rains, and Ready to Build
This was not going to be the dream workshop (or anything like it). However, I’m proud of what we’ve achieved… a clean, dry, and well-lit space — a minimum viable workshop — ready for the new build.
A spare Wi-Fi repeater and a refurbished Bluetooth speaker have helped provide the finishing touches. And as I stand at my bench listening to the summer rains beating down outside (door firmly closed!), I smile at the fact that the space is ready for a big delivery that is due any day now…
-
Yes British readers, I’m using “shop” as an abbreviation of workshop in the American style because it’s cool. ↩︎